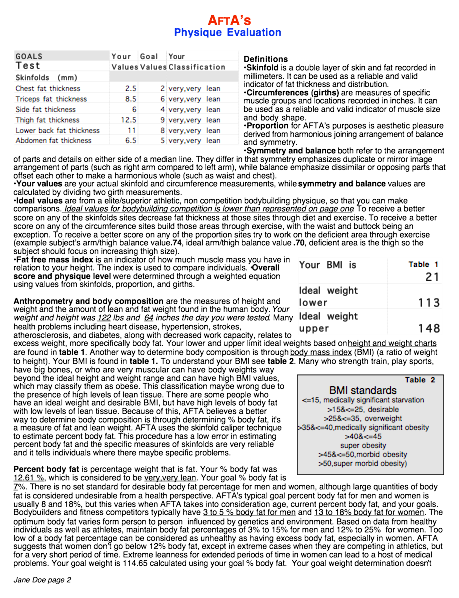
Physique Evaluation Process

Physique Evaluation
What’s the purpose? A major reason why most exercise is to improve their appearance.
Many go beyond trying to look muscular by building their physique to be like a body-
builder, fitness competitor, or athlete.
Bodybuilders have small waistlines and very low body fat, which allows the appearance
of definition lines in their large and proportional muscle bellies. Many athletes aspire to
look muscular like this.
Fitness competitors are somewhat like bodybuilders in having low body fat and toned
muscle bellies but they aren’t as muscular. Most people strive to look this way.
An athletic physique is like a bodybuilder’s physique with the exception of slightly larger
waistline and buttocks because of the need for a powerful core.
Only a small percentage of gym enthusiast actually compete in a bodybuilding or fitness
contest. There are many reasons for this, one of which is the intimidation of getting up on
stage in a small posing suit in front of many judges and hundreds of spectators and having
to do a routine to music. Another is the subjective, sometimes bias judging. Therefore,
AFTA has developed a quantitative testing protocol which will determine one’s physique
level based on multi-faceted body analysis.
Who’s the test for? The physique evaluation is for those who have been resistance train-
ing for an extended period of time and who want to take their physique to the next level by
harder training and following stricter dieting.
When does testing occur? After several months of bodybuilding, strengthening, and con-
ditioning.
What are the type of tests? AFTA physique evaluation is quite different from most phy-
sique judging for it’s purely quantitative with no visual, subjective component. We wanted
people not to worry about having to get a tan, shave their physiques, or get professional
photos. Rather, we wanted objective numbers to deal with.
There are two tests.
1. AFTA has developed a circumferential analysis that can determine where a physique is
lacking. Each circumference site gets two scores. One is based on size and the other is
based on proportion (balance and symmetry). The scores are based on a comparison of
actual with ideal circumferences. Ideal circumferences are calculated through equations
developed from the analysis of many top level physiques. The calculations take into
consideration each person’s gender, height, weight, and the physique they’re striving
for (bodybuilder, sculpted, or athletic).
2. Several skinfolds can be used to calculate body fat percentage. % body fat can be used
to calculate a fat-free mass index, which is an indicator of muscle mass. Male and
female bodybuilders strive to reach 5 and 10% body fat to be competitive, while body
sculptors and athletes strive to be 8 and 15%, respectively. A score will be given for
each skinfold. The calculations take into consideration each person’s gender, weight,
and the physique they’re striving for (bodybuilder, sculpted physique, or athletic).
The combination quantitative scores will give an overall score that will be used to deter-
mine the level of physique.
What does the client/member get from AFTA? A full ranking on all of the test, plus an
overall score that will determine the AFTA level for their physique.
How much does it cost for equipment to do the testing? If fitness evaluation equip-
ment has been purchased, $5 to $30 depending on the quality of tape measure.
How much should you charge for the testing? AFTA recommends that associates charge
$35 to $45.
How long does it take to do the test? Testing takes approximately 30 to 40 minutes.
Physique Evaluation Testing Procedures
Measurements of skinfolds and limb girths will be taken to determine physique level.
Measure/record height in inches and weight in lbs. Record height to the nearest quarter of
an inch and weight to the nearest one-half pound. Make sure that the scale is accurate and
that the client only is wearing shorts and a T-shirt with no shoes.
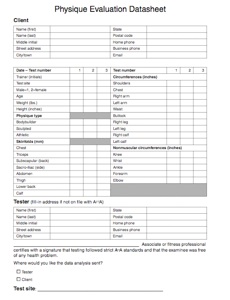
Record all data on the Physique Evaluation datasheet (Physique Evaluation
Datasheet). Make sure that the client has filled out the health record and you
both have signed it (Health Record and Release). Check off which type of physique
your client will compared to: bodybuilder, sculpted physique, or athletic.
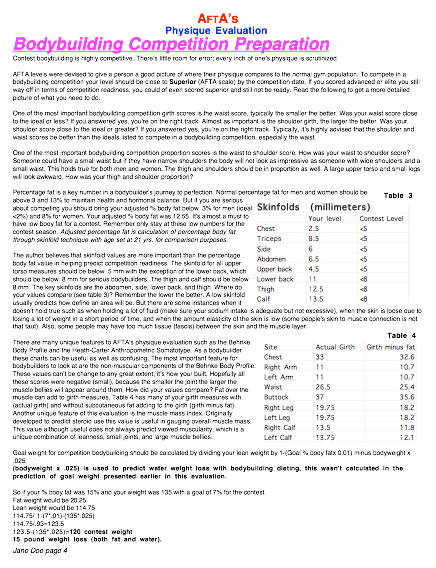
% Body Fat, Skinfolds, and Fat-free Mass Index
Purpose. The sum of several skinfolds will be taken to estimate percent body fat which
can be used to calculate an estimate fat and lean weight and fat-free mass index. Skinfolds
are a measure of the double layer of skin and fat at very specific locations. There’s a spe-
cific technique in grasping the skinfold as well as a tool (caliper) to measure a fold in mil-
limeters.
Tools. An accurate skinfold caliper. Even the plastic Figurefinder caliper (Lohman & Pol-
lock, 1981), which cost under $40, gives consistent and accurate values. The major crite-
rion in caliper selection is that it gives constant force of 10 g/mm2 at skinfold sites.
Caliper/skinfold Measurement Technique
Firmly grasp the middle of the skinfold (a double layer of skin and fat) with the thumb and
index finger. Open and place the caliper perpendicular to the skinfold at 1 centimeter (0.25
inch) from the thumb and forefinger. You must measure the skinfold at its base. Release
the caliper, exerting the full tension onto the skinfold. Read the dial to the closest 0.5 mil-
limeter approximately one to 2 seconds after the caliper was released. At least two mea-
surements should be taken of the skinfold. If the measurements vary by more than one
millimeter, take a third reading.
If after repeated measurements, the numbers begin to read smaller, the fat is becoming
compressed. This is common with “fleshier” people. If this occurs, begin to measure a dif-
ferent area of the body, and return later to previous area. The final value will be the aver-
age of the two measurements that best represent the site.
Measurements are best taken when the skin is dry. Wet skin allows the tester to grasp more
skin area, increasing the measurement size. Measurements should also not be taken imme-
diately after exercise or if the person is overheated. Both of these conditions shift bodily
fluids to the skin, increasing measurement size. Practicing taking skinfold measurements
will increase the consistency of measurements.
Skinfold Sites
All measures are taken on the right side of the body.
1. Chest skinfold is the diagonal fold taken half of the distance between the anterior axil-
lary line (front of arm pit where chest and arm meet) and nipple for men and 1 inch
from the anterior axillary line in women. Be cautious with women when taking this site
show them where you’ll be taking the measurements and get their permission before
placing the calipers
2. Triceps skinfold is the vertical fold on the posterior midline of the upper arm (over the
triceps muscle), halfway between the acromion (bony prominence on shoulder) and
olecranon processes (bony prominence of the elbow); the elbow should be extended
and relaxed.
3. Subscapular skinfold is the fold taken on a diagonal line coming from the vertebral bor-
der of the scapula to 1 inch from the inferior angle of the scapula (the lower tip of the
scapula).
4. Abdominal is the vertical fold taken at the lateral distance of about 1-2 inches from the
umbilicus.
5. Suprailium is the diagonal fold above the crest to the ilium (top of hip bone) at the spot
where an imaginary line would come down from the anterior axillary line (front of arm
pit).
6. Lower back is a lateral fold 2 to 3 inches above the ilium (top of hip bone) and 2 to 3
inches from the spine.
7. Thigh skinfold is the vertical fold on the anterior (front) aspect of the thigh midway
between hip and knee joints.
8. Calf skinfold is a vertical fold taken from the back on the inner aspect of the belly of
the gastrocnemius.
Circumferences
Purpose. Determine the girth (size) of muscle groups and body parts through use of a tape
measure.
Test area. Private room.
Procedure. AFTA would prefer the use of a Gaulick, Figurefinder, or similar tape mea-
sure which exerts a consistent amount of pressure when performing circumferential mea-
sures (the measure of the girth (size) of a muscle or body part). If you don’t have one
apply enough pressure with a cloth tape measure that there’s a small indentation (dimple)
in the skin.
Circumferences sites. Measure to the nearest quarter inch and record all data on the phy-
sique evaluation data sheet.
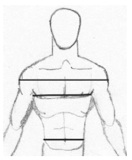
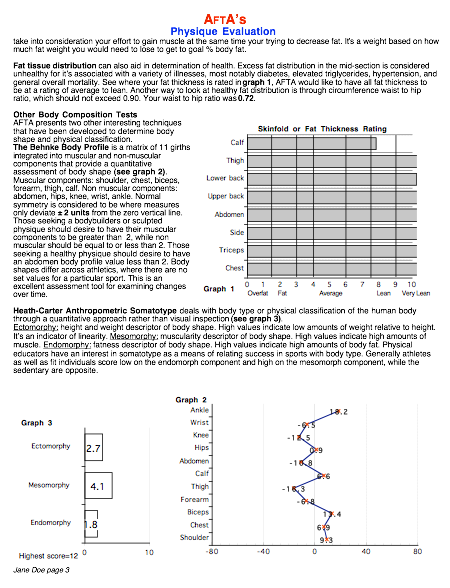
FIGURE 2. Front and Rear Upper Body Circumference
•Shoulders – Place tape over the maximal protrusion of chest, above the maximal pro-
trusion of each deltoid, and measure at the back having the lats flared as wide as they
can, make sure the tape measure remains parallel with floor.
•Chest – Place tape over the maximal protrusion of chest, under arm pits, and measure at
the back with lats flared at mid inspiration.
•Right and left thigh – Measure below the buttocks (gluteal fold), with legs extend and
tightened, make sure the tape measure remains parallel with floor, and measure at the
side.
•Abdomen – Place tape one inch above the umbilicus (navel), make sure the tape mea-
sure remains parallel with floor, and measure at back.
•Buttocks – With the heels together place tape at maximum protrusion of the buttocks,
make sure the tape measure remains parallel with floor, and measure at the side.
•Right and left upper arm – Arm up and flexed, fully tightened, with humerus (upper
arm bone) parallel with floor, place tape perpendicular to floor, measure at the highest
peak between the shoulder and the elbow.
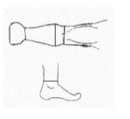
FIGURE 3. Upper Arm and Ankle Circumferences
•Right and left leg – Just below the gluteal furrow (buttock crease) about 2/3 the dis-
tance from the mid knee to the crotch. Keep tape measure parallel to floor.
•Right and left calf – Measure at the widest circumference midway between the ankle
and knee make sure the tape measure remains parallel with floor.
•Knee – Middle of the patella with knee relaxed in slight flexion.
•Wrist – Circumference distal to the styolid process of the radius and ulna.
•Ankle – Minimal circumference, just above the malleoli (ankle bones).
•Elbow – Minimal circumference, between the forearm and biceps musculature.


Physique Evaluation Datasheet

Health Record and Release
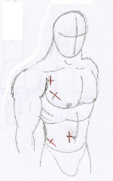

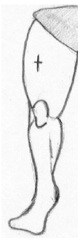
FIGURE 1. Upper Body Front and Back Skinfold Sites
FIGURE 2. Front and Rear Upper Body Circumference
FIGURE 3. Upper Arm and Ankle Circumferences

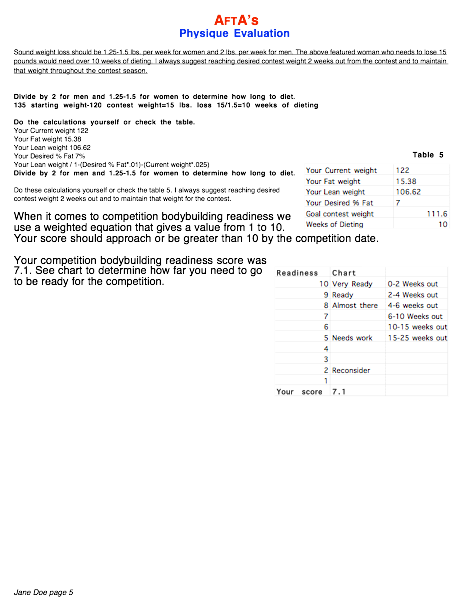
Example of an Evaluation
(5 pages)