Simple Fitness Evaluation

Simple Self-Fitness Evaluation
To help in building an adequate level of fitness you need to find your starting point. This foundation can be determined through several simple tests.
Unfortunately most people starting a program and some fitness professionals do not perform any type of tests.
A fitness evaluation allows an understanding of where you're starting from, aids in the design of your program, and denotes progress.
What’s the purpose? Our self-fitness evaluation determines the level of health-related fitness components (body composition, flexibility, muscular strength and endurance, and aerobic capacity.
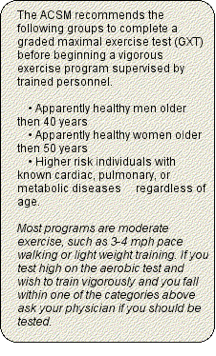
Who are the tests for? Anyone starting or currently within a general fitness program who is in good health.
Physical Activity Readiness
Before testing or training for the first time complete the physical activity readiness questionnaire. If you have already done this move on to the tests.
For more details on readiness to exercise go to the following webpage. PAR-Q
Make sure you answered all the health assessment questions before you test yourself. If the assessment suggests that you should get a physician's clearance get it.
When does testing occur? Before beginning a program and then every 3 to 6 months.
Important note: You should give an all out effort but don't over do it. Soreness may be experienced the next couple of days after testing.
Before starting you'll need to learn how to measure heart rate and how to judge your level of exercise exertion as well as complete the physical activity readiness questionnaire. These techniques will be valuable in your training program. If you know how to measure heart rate and RPE and are in good health move on to the tests.
Remember to record and date all data. This will be valuable information that you'll continually refer to.
Download data sheet.
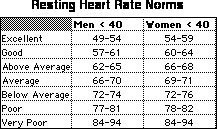
Heart rate (pulse rate )
Measure your heat rate at rest, preferably in the morning after awakening. It's a good idea to take 2 to three measures of resting heart rate. Be aware that resting heart rate is variable throughout the day. A low resting heart rate in most cases is indicative of a conditioned person, but not always, in some cases it may indicate a diseased heart. Many highly trained athletes have resting heart rates below 50 beats per minute (bpm).
Tools. Stopwatch
Procedure. Use your thumb or index fingers to locate the radial pulse on the outside of your wrist just below the base of your thumb. Don't use your thumb because it has a pulse of its own. If locating the radial pulse is difficult try finding the carotid pulse on the front of your neck. Use light pressure when measuring at the carotid artery. Heavy pressure may cause your heart rate to slow down due to the baroreflex. If you start the stopwatch simultaneously with pulse beat count the first beat as zero and if the watch is running count the first beat as one. Count the number of beats over 10 or 15 seconds and multiply this number by 6 or 4, respectively to get beats per minute. Because there is an immediate and rapid decline in heart rate when you stop exercising a shorter count will be closer to your actual exercise heart rate. A rapid decline in heart rate after exercise in most cases is indicative of a well-trained person. An elevated heart rates after exercise may indicate a poor level of condition or a state over training.
< 60 bradycardia (slow rate)
60-100 bpm normal rate
>100 bpm tachycardia (fast rate)
Some people like to use electronic heart rate monitors. There are many on the market providing accurate and almost instantaneous measures of heart rate.
Rating of Perceived Exertion (RPE
The Borg Rating of Perceived Exertion (RPE) scale is a great way to note exercise intensity. It's a subjective estimation of how hard a fitness test or exercise is. During some of the tests and exercises we will ask you to rate the degree of perceived exertion you feel. By perceived exertion we mean the total amount of exertion and physical fatigue. Don’t be concerned with any single factor such as leg pain, difficulty breathing, or work grade, but try to concentrate on total, inner feeling of exertion. The RPE scale is also useful for people taking medications that affect heart rate, such as beta blockers. When you exercise, you want to keep your RPE between 11-14, which means that you rate your exercise as "somewhat hard." You generally don’t want to go above 15, which correlates with feeling as though you are exercising "hard (heavy)" or "extremely hard." The Borg scale is as follows:
6 no exertion at all (this is equivalent to sitting in a chair and reading)
7 extremely light
8
9 very light
10
11 light
12
13 somewhat hard (this is equivalent to swimming laps, bicycling 4 miles, or fast dancing)
14
15 hard (heavy)
16
17 very hard
18
19 extremely hard
20 maximal exertion (this is equivalent to jogging up a very steep hill)
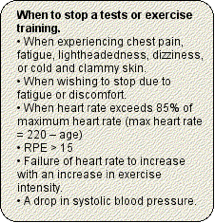
Warm up before testing as well as any exercise session. It prepares the body by allowing your heart rate and breathing to increase gradually.
After completing any of the tests any exercise session walk around still recording heart rate. This is known as active recovery. Don’t go onto other tests unless your heart rate drops below 100 beats/min. Active recovery reduces the risk of hypotension (low blood pressure) that is caused from extremity venous pooling.
Remember to warm up before an exercise session or testing through gradual exercise and cool down through active recovery. These principles are major tenets of a well-designed program.
Cardiorespiratory endurance
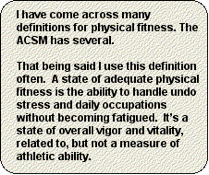
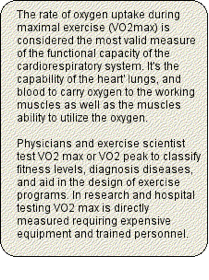
Cardiorespiratory endurance is one of the most important measures of fitness. It's the ability to perform dynamic exercise using large muscle groups at moderate to high intensity for prolonged periods (ACSM 2006).
A VO2 max test is an arduous task taking a person to the extremes of their physical ability. Although a maximal test is more accurate we suggest a sub-maximal test due to less chance of injury and cardiovascular compromise. Even though sub-maximal tests is an estimate VO2 max with a degree of error the relative change overtime from pre and post training is informative.
Aerobic Tests
Listed two types of sub-maximal aerobic capacity tests. Find one that works best for you or your clients.
The first requires exercising on a treadmill or an exercise machine at a somewhat hard pace for 5 minutes. This test is suitable for people of all ages, who are in very good physical condition (no risk factors or signs or symptoms of disease). It is a very easy test to implement with very little calculation required. This test has not been validated by research, but appears scientifically sound.
The next is the Rockport walk test which is designed for people of all ages but works best for older and sedentary individuals. It requires walking outdoors on a flat mile course. This test has been validated by research and has low error of estimate.
1, MET Aerobic Test very good physical condition
Tools. RPE Chart, heart rate monitor (optional), and calculator.
Test area. Treadmill or exercise machine
Procedure
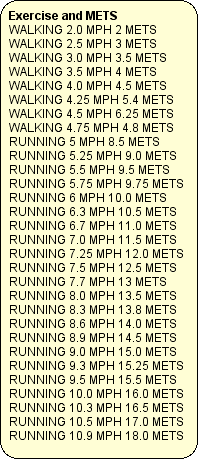
Walk, jog or run on a treadmill at what you feel is a somewhat hard pace for 5 minutes (record MPH). You must keep the somewhat hard pace up for five minutes, don't count the warm up towards the somewhat hard pace. This test works best if you're experienced using a treadmill. The other option is to use an exercise machine (bike, climber, elliptical) that displays a MET value on its console. Find a cadence on the machine that feels somewhat hard which you can sustain for 5 minutes. The somewhat hard pace corresponds to a 13 on a RPE chart (see RPE chart). This test is suitable for people in good physical condition who exercise regularly (no risk factors or signs or symptoms of disease). Measure heart rate and rating of perceived exertion at end of test and record. Make sure you warm up before and cool down after the test for several minutes.
Find the corresponding MET value on the chart to the right and use its value in the following equation.
Estimated VO2 max=(MET) x 1.35 x 3.5
Example: So if you ran on a treadmill and your are 50 years old at what you perceived as a somewhat hard pace of 6 mph then your estimated VO2 max would be
Estimated VO2 max=(10) x 1.35 x 3.5=47.25 ml/kg/min (Considered Superior)
2. Rockport one mile walking test (flat course) sedentary individuals
Tools. RPE Chart, Heart rate monitor (optional), and calculator.
Test area. 1 mile flat track/course.
Procedure
This test is suitable for both sedentary and active people of all ages (20-69) because it only requires fast walking. It is suggested to be most useful for older and sedentary individuals. Make sure you warm up before you start the test by performing a light walk. After the warm up walk one mile as fast as you can. At end of mile record your time and measure heart rate and use this data in the following equation. Make sure you warm up before and cool down after the test for several minutes.
Example: Male, 50 years old, walks a mile in 15 minutes, Heart rate at end 130 beats per minute
VO 2 max=132.853 - (0.0769 x (bodyweight lbs.)) -(0.3877 x age) +
(6.315 x gender male =1 female=2) - (3.2649 x time in minutes) - (0.1562 x heart rate)
132.853 - (0.0769 x (150*.0769)= 121.3
-(0.3877 x 50)=19.4
+(6.315 x gender male =1)=6.315
-(3.2649 x 15)=45.7
-(0.1562 x 130)=20.3
Estimated VO2 max 42.2 ml/kg/min (Considered Superior)
See Aerobic Capacity Classification on chart
Muscular endurance tests
Purpose is to determine muscular endurance (the ability of muscles to repeatedly contract) through 3 tests and a spinal endurance test.
Lower body muscular endurance (Step ups)
Purpose is to test the lower body musculature endurance.
Tools. Stop watch, lower step of a flight of stairs (8 inches or more)
Procedure
Jump up and down onto a step or lower step of a staircase as many times as possible within 1 minute. A complete step is where both feet come up and touch step as well as both feet returning to floor. Record number of complete steps in one minute.
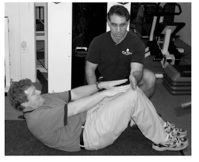
Mid body muscular endurance (Modified Sit-up Test)
Purpose is to test the abdominal musculature’s endurance.
Tools. Stop watch, exercise mat
Procedure
Lie on mat with feet flat on floor and knees bent at a 90-degree angle. Crunch with arms and fingers fully extended, hand over hand, curling up so that the extended fingers touch the top of the knees (tuck chin to avoid neck strain). Return all the way back placing shoulders on the floor. Perform in a slow, steady manner as many modified sit ups as possible with good form. When muscles other than the abdominals are being used terminate test. Breathe normally throughout
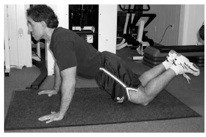
Upper body muscular endurance (Push up test)
Purpose is to test the pectoral girdle and triceps musculature endurance.
Procedure
Women are usually tested in a modified position, with knees on a mat and legs at 90 degree angle, with the rest of their body straight, while men typically have their feet on the floor. Both positions will have hands shoulder width apart inline with the shoulders, hands flat on floor, and back straight. The push up start position is full extension. The end phase is 3 to 5 inches from floor. Perform each complete repetition over 3 seconds, 2 seconds for the lowering and hold phase and 1 for the return. Perform as many pushups as possible with good form. When muscles other than the intended are being used or when the back doesn’t remain straight stop the test. Listed below are above average scores.
See Muscular Endurance Classification on chart
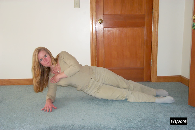
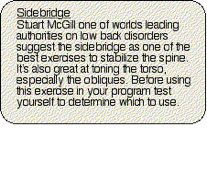
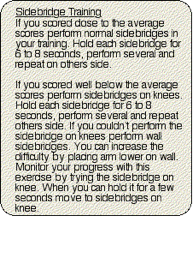
Lateral musculature endurance test (Sidebridge)
Purpose is to test the muscular endurance of the lateral spinal stabilizers.
Procedure
Test yourself by lying in a full sidebridge position with legs extended with top foot placed in front for support. Make a straight line with your entire body by holding yourself for as long as you can on one elbow and both feet while lifting hips off the floor. Other arm is placed across chest holding onto shoulder. Stop measuring when body loses the straight back position. Measure in seconds and perform on both sides.
Average approximate sidebridge times for those with no lowback disorders.
Men 95 secs
Women 75 secs
A large difference between right and left sidebridge scores have been shown to occur with people suffering with lowback disorders.
Inability to perform sidebridges suggest spinal weakness. Core training should be implemented.

Strength tests
AFTA has developed a testing protocol using the basic strength exercises found in most health clubs with a single set, multiple repetition test which is safe and accurate.
Tools-free weights (dumbbells and barbells) and flat bench.
Squat Test
Purpose is to test squatting ability. Gives an overall understanding of functional ability.
Procedure
Stand with feet shoulder width keeping the head up, squat down to ninety degrees of knee flexion bending forward at the waist and then rise back up pausing at the top of the motion. Try to keep the natural curve of the spine. Repeat several times. Ninety degrees of flexion is where the thigh is parallel to the floor.
Answer these questions.
-
1)Was the motion easy or difficult? If it was difficult you need to practice this motion. Squatting is an essential activity of daily living.
-
2)Did you have knee pain? If you did it might be an early sign of degenerative joint disease or patellofemoral syndrome. You will need to be cautious when you train. You might want to seek out a physical therapist before you start a vigorous resistance training program. Popping and cracking are usually normal but could be a sign of early degeneration.
-
3)Were you able to get down to ninety degrees of flexion? 90 degrees is the norm, you should not go beyond that when you train. Not getting to this point could be due to lack of flexibility and/or strength.
-
4)Did you knees knock together? If they did your inner thigh muscles may be tight and/or stronger than your outer thigh muscles.
-
5)Did you heels come off the ground? If they did your calf muscles may be tight.
-
6)Did your low back straighten out or flex forward, in other words did you lose the normal lumbar curve. If you loss the natural curve to your back when squatting try it again, practice it. Keeping the natural curve protects it from injury during squatting motions. Losing the natural curve while squatting might indicate a weakness to your CORE. You might want to implement a CORE training program.
If you didn't have a problem with this test try the dumbbell squat test.
Lower body strength test (Dumbbell Squat Test)
Purpose is to test the strength of the lower back, gluteals, abdomen, and quadriceps.
Procedure
Stand with feet shoulder width apart holding a dumbbell in each hand (women 15 lbs., men 25 lbs.). Keeping the head up, squat down to ninety degrees of flexion and then rise back up pausing at the top of the motion. Always maintain the natural lower back curve. In other words keep normal spine curve and don't flex forward. Repeat until exhaustion or form deteriorates. The movement should have a 3-second count; 1 second for the lifting phase and 2 to 3 seconds for the lowering phase. Pause at the top of motion. Select a weight that you can perform no more than 12 repetitions. Breathe normally throughout.
Above Average*
Men 40 pound dumbbells for 12 reps
Women 20 pound dumbbells for 12 reps
*Age 35 years men body weight 170 and women 135 lbs.
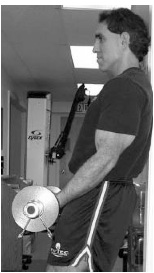
Upper body strength test (Arm Curl Test)
Purpose. Test the strength of biceps.
Procedure
Stand straight with back against wall extending the arms fully holding a barbell (straight or easy-curl bar) or two dumbbells. Flex your arms, curling the bar up to shoulder level without having the back come off wall. Then fully extend the arms back down and repeat until exhaustion or form deteriorates. The movement should have a 3-second count; 1 second for the concentric action (shortening), and 2 seconds for the eccentric action. Don’t allow a new repetition until the beginning of a new 3-second interval. Breathe normally throughout.
Above Average*
Men 30 pound dumbbells for 12 reps
Women 15 pound dumbbells for 12 reps
*Age 35 years men body weight 170 and women 135 lbs.
Upper body strength test (Flat Bench Press Test)
The purpose is to test the strength of the pectoral girdle and triceps.
Procedure
Lay back flat on a bench, keeping the feet flat on the floor. Grasp both handles of the barbell, keeping the hands placed further apart than the shoulders. Lift the weight upwards and lower bar down touching the chest and then return the bar to slightly full arm extension. Repeat until exhaustion or form deteriorates. The movement should have a three-second count; one second for the concentric action, and two seconds for the eccentric action. Don’t allow a new repetition until the beginning of a new 3 second interval. Breathe normally throughout.
Above Average*
Men 110 pound barbell for 12 reps
Women 45 pound barbell for 10 reps
*Age 35 years men body weight 170 and women 135 lbs.
Flexibility tests (Range of Motion (ROM))
Purpose is to measure flexibility (the extensibility of a joint(s) and its supporting muscle, tendons, and ligaments) through 5 tests.
1) Neck
Moving your head in different directions will help you understand if you could have a
potential neck problem. Look to your right and then your left. Was it the same or was one side easier to move? Was there any pain? Pain could be a sign of dysfunction. Try bringing your shoulder to your ear on both sides by shrugging your shoulder and tilting your head. You should be able to do this pain free. Bringing your chin from your chest to where your looking at the ceiling should be pain free fluid motion ending with your face parallel to the floor.
2) Shoulder
To measure shoulder rotation, try the motion of reaching
behind your back and trying to scratch an itch, sometimes called the Apley
Scratch Test. This functional motion is required in daily activities such as
reaching into a back pocket, bathing, or fastening clothes. Typically, people
are able to come within a few inches of the opposite shoulder blade. The
dominant arm typically reaches less than the nondominant.
3) Lower Back
To test the extension of the lumbar spine, lean backwards as far
as possible. The amount of extension is measured from the trunk line and
vertical line. Normally, 20–30 degrees of extension is possible without pain.
Loss of low back range of motion might be an early indicator of developing
osteoarthritis.
4) Knees
Lying on your back, flex the knees as far as possible. Normally, you
should be able to bring your knee close to your buttock or even touch it.
This corresponds to an angle of approximately 130–150 degrees. Flexion
to 110 degrees is usually sufficient to allow individuals to climb or descend
stairs and to complete other activities of daily living. Comparing the heel to
buttock distance on both sides is a good way to assess the loss of flexion.
Often, loss of flexion is due to joint swelling or arthritic changes within the
knee.
5) Hips
Early degenerative changes in the hips may be detected through an
assessment of hip rotation. Hip rotation is where an extended leg is turned
in and out. People with early degenerative arthritis of the hip joints frequently
lose rotation in the affected hip before losing flexion or abduction. They may
also experience groin pain that limits passive rotation.
Body Composition
Circumferences are an easy way to assess your body composition over time.
Purpose. Determine the girth (size) of muscle groups and body parts through use of a tape measure.
Procedure. AFTA prefers the use of a tape measure which exerts a consistent amount of pressure when performing circumferential measures (the measure of the girth (size) of a muscle or body part). If you don’t have one apply enough pressure with a cloth tape measure that there’s a small indentation (dimple) in the skin.
Circumferences sites. Measure to the nearest quarter inch and record all data on •Abdomen – Place tape one inch above the umbilicus (navel), make sure the tape measure remains parallel with floor, and measure at back.
•Buttocks – With the heels together place tape at maximum protrusion of the buttocks,
make sure the tape measure remains parallel with floor, and measure at the side.
See Body Composition Classification on chart


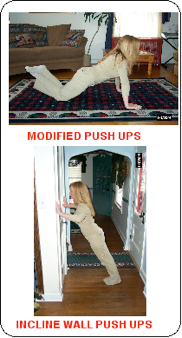
Modified Push-up Test
Modified Sit-up Test
Dumbbell Squat Test
Arm Curl Test